A link to our Shop

At times we have to choose between the path that is conventional and the path that is not. In today's world that once worn path that our great grandparents traveled is so overgrown and forgotten that it barely exists. Our goal is to reforge that forgotten path and make it new again.

The Family Eggers

The Family Eggers
Showing posts with label Mushrooms. Show all posts

Monday, March 9, 2015

Homemade Paper

This could be a lengthy blog post because there is so much information to pass along.  I could go on about the paper making process, but there are literally dozens of other websites that do a much better job than I ever could explaining how it is done.  Perhaps one day I’ll do a video, but for now I’ll just give my insights about an extremely cool hobby.   I’ll also post links to a few of the resources I used to get started.

I have made paper from a wide variety of resources.  There are two main categories of material used for paper; raw and previously processed.   This is pretty much the same as using either raw material or recycled material.  I’ll list them below:
Recycled material:
Old paper:  This is probably the easiest material to obtain and also the material easiest to work with while making paper since it takes very little additional effort to make old paper into handmade paper.   Most paper is made from wood pulp.  Wood pulp paper has a lot of draw backs such as short fiber length and poor fiber quality.  This in turn leads to a relatively short life span for wood pulp paper.   Look at old newspapers or books and you will see how brittle the pages are.  Paper made from linen or cotton will hold up for hundreds of years, wood pulp paper starts deteriorating after 10 years or so.   
Cotton cloth:  Using cotton rags to make paper is a very interesting way to recycle that old T-shirt that is still sitting in your closet from back in high school, or perhaps those holey denim jeans that you are hanging onto to wear after you lose weight.    
In order to reduce the fabric fiber into paper fiber, the fabric must be separated into individual fiber components. The traditional way to process fabric back to fiber suitable for paper was with a machine called a Hollander beater.  Basically the cloth is pulverized repeatedly until it has the consistency of paper mache. 
Hollander beaters cost upwards of $2,000 on the cheap side, so I had to find another way.  What else pulverizes anything that enters it?   A Vitamix blender!   This is worthy of its own blog post so once I have the post up - click here - to see the process and results.  The bottom line is that it works quite well.

Denim from Mackenson's blue jeans.  Nearly completely pulped on the left.


Linen Cloth:  I used linen rags acquired cheaply at a local thrift store.  The process is the same as for cotton
Silk:  I also found some inexpensive old silk clothing articles at the local thrift store. Once again I use the same process as for any other fabric.

Burlap/Sisal, Jute and Hemp fabric:   I haven’t tried these yet, but the process will be the same as other cloth. 

Raw fiber materials:  Pretty much any plant fiber can be used to make paper.  The trick is to find plants with long enough quality fiber to be able to extract it manually, chemically or mechanically without losing it.  There are hundreds of potential plants to use.  I list the ones I have used.  I’ll write another blog post describing the process, it is somewhat entailed. 
Iris leaves:  For those who grow iris plants you know that every year in the fall the outside leaves turn white or tan and die.  Have you ever noticed how thick and strong the leaves are?  This was the first material I used to make paper, and an excellent source of fiber.  It makes a dark tan to light brown paper if using dead iris leaves.
Cattail leaves:  I’ve heard of people using the cattail fluff as well.  It would be an interesting experiment to try.  This is the highest quality paper I have made.  It is very smooth, very strong and works in an ink-jet printer.
Morning Glory Vines:   This one did not work out as well as I had hoped.  Likely it didn’t work as well because I did not process it enough.  However, it still produced a paper that looked pretty cool and good for wrapping things (like x-mas presents) to give them a natural look.
Dogbane Hemp:   This is very similar to milkweed (see below).  Use the bast fiber (bark) of the dogbane hemp plant.  There are challenges when using bast fiber of broadleaf type plants over the leaf fiber of grasses (like Iris and cattail).  The main difference is that fiber yield is lower, and separating the bast from the stem is time consuming.  There is also considerably more foreign material left over after processing.  The benefits are that the fibers are MUCH stronger than the other fibers mentioned before.
Milkweed:  As far as paper is concerned, it is very similar to dogbane hemp. I used the bast fiber.   Any reason to use milkweed is a good reason. One of my goals is to one day grow at least some milkweed commercially for fiber purposes while helping the monarch butterfly.    As you may know the milkweed also has the silky material that is fluffy.  I have yet to try to turn this material into paper, but the day is coming.  Coincidentally, dogbane hemp also has silky material in it’s seed pods.
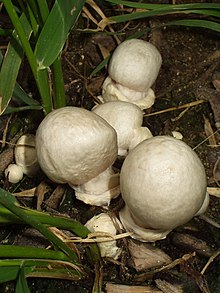
Birch Polypore mushroom:  We are mushroom fanatics, and I received a birch polypore mushroom from a co-worker.  I regularly get random mushrooms given to me by co-workers who know I enjoy collecting edible mushrooms.  Unfortunately the Birch Polypore is unpalatable (though technically not poisonous).  Thinking back to my biology 101 days, I got to thinking about fungi.  I found a couple of people who had turned other polypore mushrooms into paper, so gave it a go.  It is possible to turn a birch polypore into paper.  However, the fiber length is fairly short meaning the paper is more delicate than other papers I have made.   Also, the mushroom pulp is very sticky, and this makes the process of couching (see other post) more difficult.
A few other plants I plan on using:  Pineapple (as soon as I collect enough tops),  Hops vine, snow on the mountain (I have some collected), nettle, and  lilly leaves.  I’d also like to try a few other types of mushrooms.   

A list of resources that I used and got me started.
Wiki-How;  Gives the basics

Mother Earth News:  Also fairly basic

Video from epicfantasy:  This guy has a lot of really cool stuff and a neat haircut!

More advanced, but very useful for turning raw material into fiber


A quick google search will lead you to a lot of resources. 

Tuesday, October 29, 2013

Boletes


Bolete species growing under a pine in October.  Notice the pine needles.
We have recently expanded our mushroom foraging species list to include Bolete species.  Until now we have avoided most ground mushrooms, especially those with the traditional mushroom shape.  Most of the toxic species of mushrooms are the ones that grow directly on the ground.  Through reading and internet research we were able to positively identify the bolete family of mushrooms and realized that the vast majority of boletes are edible, with only a few exceptions.  Boletes are easy to identify, relatively safe, and very tasty.
Smaller boletes.  Notice the yellow pores under the cap.

How to identify a bolete:  The family of bolete mushrooms have pores instead of gills under the cap.  Simply pick the mushroom and flip it upside down.  Gilled mushrooms will have radial gills looking like spokes of a bicycle wheel.  Boletes will have pores that look like a sponge.

The poisonous boletes:  All texts agree that the toxic boletes share one or both of the following characteristics:

#1 The pore surface under the cap will be red or orange.   
#2 The flesh will stain blue or purple when bruised or cut.  

All the toxic species of bolete mushrooms have one or both of these characteristics.  That does not mean that just because a bolete stains blue or has reddish pores it is toxic, but it is a good starting point to exercise a lot of extra caution.  If neither of the above criteria are met, the mushroom is safe.

Just because it is safe to eat, it still may not be palatable.  There are a lot of bitter boletes out there that while technically safe to eat, a person probably would not want to due to flavor.  This is why it is still advisable to figure out exactly what it is that you plan to eat.  This includes identifying the species of bolete you plan on eating.  It is also advisable to try a small sampling of mushrooms prior to eating them just in case.  

Boletes can be sauteed with butter or oil, baked or even grilled.  They can be preserved by freezing, dehydrating, or even pickling. 

Warning: As with all wild foraged food do not eat anything unless you are 100% sure what it is and how to prepare it.  When in doubt throw it out.

Saturday, October 26, 2013

The Bearded Tooth


   I found this beauty while taking a quick walk in a wooded area.  He was on the end of a decaying log and though I was looking primarily for sulfur shelf, this was a nice consolation prize.  The bearded tooth mushroom is one of those oddities that a shroomer comes across once in a while, even if he/she is not looking for it.  Also known as the Lion’s Mane,  Bear’s Head Tooth, and Comb Tooth it has a very distinctive look.  It is in the genus Hericium and some texts say there are three separate species and these are nearly indistinguishable from each other.  It is very distinctive and nothing looks quite like it.   There are no poisonous look alikes and is considered a choice edible by many.  With no poisonous look alikes, an excellent forage mushroom for beginners.  We find it a strong tasting mushroom, and the texts say younger specimens are bland with older specimens becoming sour.  Perhaps we are getting older specimens or not preparing them soon enough, but we find this mushroom pleasant overall even if it has a strong flavor.
   We wound up sauteing him and some puffballs in olive oil with some garlic and onion.  We mixed in a few green tomatoes and peppers from our garden all in a curry sauce.  We had this concoction over some brown rice...delicious.

As with all foraged foods, do not eat anything unless you are 100% sure of what it is.

Friday, October 25, 2013

IS THAT MUSHROOM SAFE?


IS THAT MUSHROOM SAFE?


Sulfur Shelf or Chicken of the Woods  (Edible -Choice)
The question and concern from family and friends when we tell them we forage for mushrooms (and other food) is sometimes overwhelming.  Though we appreciate the concern, we sometimes wonder why.  It is probably because of the lore behind mushrooms killing the unsuspecting person, or portrayal by the film industry with the assassin posing as a chef feeding his target a poisoned mushroom soup.  There is also the occasional report of a child (or drunken adult)  unsuspectingly eating mushrooms from the yard and ending up in the emergency room.  While all of these situations are plausible and can happen, they are all easily avoidable.

Though it is true that toxic and even deadly mushrooms are quite common, some basic safety tips will avoid poisoning for you or your family.  We are specifically talking about mushroom foraging, but the same rules apply for plant foraging.  

#1:  Do not eat anything if you are not 100% sure what it is.  We continually say this as does every person and book that teaches foraging.  It is the #1 most important rule….positive identification.  There are numerous field guides, identification guides and internet sites available.  A google search of foraging clubs and classes in your area can also be helpful to attend or join.  WHEN IN DOUBT THROW IT OUT!   

Destroying Angel (toxic / deadly)
 #2:  Know what NOT to eat!  Knowing what is toxic is probably more important than knowing what is edible.  If we think back to childhood, this was a basic premise that are parents instilled.  Stay away from things you know can harm you.  In the case of mushrooms, there are really only a few species that are truly deadly and a handful of others that will make you sick.  Learn how to identify these first.

#3:  Nearly all wild mushrooms need some processing before being consumed.  Most should be cooked whether by frying, boiling, baking or grilling.  Many can be dehydrated or pickled and a few can be frozen to be later used in your favorite dish.  Many field guides and internet sites have recommendations for preparation.    

#4:  Try only a small sample or taste the first time you try a new type of mushroom (or foraged food).  Wait at least 24 hours before consuming more (some guides recommend waiting 48 hours).  Even if you are sure about the mushroom (or any foraged food) you have, some people can adversely react.  Some wild mushrooms may not affect one person, but make the next person ill.  All people are not built the same in regards to what they can and cannot eat. 

If a person follows these basic rules, a safe and happy foraging experience will be the outcome.   Our ancestors followed these rules and most lived long happy lives.  There is a valid argument as to whether eating these "back to nature foods, could actually mitigate many of the chronic illnesses we have in the modern world.  Anecdotally, we have noticed a significant reduction in some of our minor chronic health issues over the past few years including allergies and gastro-intestinal problems.  This increase in health has coincided directly with our increase in dietary variability including wild and foraged foods.  We feel better physically and feel better socially by not contributing to the over-processed food industry.

Friday, October 18, 2013

Puffballs; The Gift


Word of our foraging is slowly expanding to new horizons.  Last week we were talking with a new-found friend (HI MANDI) and telling her about our foraging.  This week she brought us THREE puffball mushrooms of varying size that she had found in a local park.  After some quick research we deduced that they are in fact the purple spored puffball or Calvatia cyathiformis.  There are no poisonous look alikes (see bottom of post) so we went ahead and prepared a few for an evening snack.  We simply pan fried a few to see what they tasted like.  To our joy and amazement they are absolutely delicious.  It is very difficult to compare the taste to anything else, but they have a sweet and savory flavor.  We pan fried (sauteed) and froze what we were not going to eat immediately, and will have the rest with or on our Friday night pizza.  We want to give a big shout out to Mandi.  We owe you (and your husband and kids if you choose) a 6 pack of beer, some handmade soap and maybe even a dinner at our place sometime.  Even when we give you all of these things, we will still get the better part of the deal.  These are quite possibly the best mushrooms ever to cross our palates.


Puffball mushrooms are large mushrooms found in midsummer into the fall.  Large puffballs such as the "Giant Puffball" and "Purple Spored Puffball" can get the size of a soccer ball.  Most puffballs are edible except the "Pigskin Poison Puffball."  The "Pigskin Poison Puffball" will have a dark purple to black center when cut into.  All other puffballs are edible as long as the inside flesh is white.  When a puffball ages the white flesh will turn orange to green and will be past its prime.


Warning:  Though puffball mushrooms are ideal for beginning shroomers, there are a few easy ways to avoid mixing them up with anything else.

Puffballs smaller than a fist  could be confused with immature Amanitas (poisonous), but are easily distinguished when cut into.  The puffballs will have no evidence of an internal stem and no gills.  Amanitas have both.

Poisonous Earthballs  (Scleroderma species) are very hard and are black on the inside unless very young.  Puffballs are quite soft throughout there life.

REMEMBER:  Internal white flesh means you have a treasure to tempt your palate when dealing with puffballs.


DISCLAIMER:  As with all foraged food do not eat anything unless you are 100% sure what it is.  This is especially true with mushrooms.  We highly recommend you get some good field guides and take foraging or mushroom classes if available before starting on your foraging journey.  It can be (and is) a highly rewarding experience, but caution must be exercised for safety reasons.

Sunday, October 13, 2013

Chestnuts roasted into a meal desired

If you saw our previous post about chestnuts you know that I collected over three pounds of them from a couple of trees at my place of work. (SEE POST)  Since that post I have collected an additional three pounds +.  The current tally is 6 lbs 4 oz. of chestnuts.  So, what do you do with chestnuts?  Well you roast them of course.  We did not have the set up for an open fire, but the oven worked as a pretty good substitute.  We baked them at 400 F for 30 minutes.  To prevent the nut from exploding in the oven, the shell must be scored to allow steam to escape.  After baking, the nut itself softens and is very starchy.  The taste is very similar to potato, but slightly sweeter and with a firmer texture.  We made a casserole from the following ingredients (AKA a "hot-dish" for you Minnesota folks):
Pre-roasted chestnuts

Chestnuts:  We used about 1 1/2 cups of roasted and shelled chestnuts.

Mushrooms:  We used about 4 cups of Hen of the Woods (HOTW) mushrooms that we had collected earlier in the day. See Post  HOTW was sauteed with onion, green and red bell pepper and garlic.

Cheese:  We used a combination of cheese ends from our local market deli.  Mostly swiss cheese.

Tomatoes:  Cherry tomatoes were thrown in there from our garden.

Add chestnuts and sauteed mushrooms to a baking dish.  Sprinkle shredded cheese or cheese pieces over the top.

Bake at 375 F for 20 minutes.

This is probably one of the best casseroles we have had in a long while.  Completely vegetarian and very versatile.  The flavors blended together perfectly and the texture was perfect.
Finished meal with casserole, pear sauce and watermelon.  The majority of the food on the plate is homegrown or foraged making this meal cost only a few pennies.

Wednesday, October 9, 2013

Fall Foraging part 1


Our foraging has increased in intensity as the cooler fall weather sets in.  The trees are dropping their nuts and fruit.  Fall mushrooms are appearing en masse.  Last weekend we collected the following:

Hen of the Woods Mushroom (HOTW):  One of our favorite Autumn finds.  These large bracket fungi appear around oak tree trunks and stumps.  This past weekend we collected three different hens weighing in at a combined 6lb. There is a park filled with oak trees near our neighborhood and we were able to find these beauties in abundance.  HOTW can be prepared like almost any mushroom and we use them in a lot of different recipes.  They can be sautéed and frozen or dried for long term storage.  Many of our recipes use HOTW.  See last year's HOTW post.
Marie is holding the largest with a smaller HOTW beside Mackenson


Acorns:  Acorns are a food that are commonly ignored by the majority of folks, foragers included.  We were able to collect about two gallons of acorns thanks to Marie and The Nut Wizard®.  Acorn processing is a bit of a trick, so stay tuned for an entry about this process.

Pear shaped puffball mushrooms:  These are a new foraging item for us.  They are a choice mushroom found on decaying logs.  We found a large cluster of these delicacies, but unfortunately were about a week late on the find.  The majority of these were past their prime and we wound up with only a few that were still edible.  These few were sautéed for our Sunday brunch.
Puffballs:  One with the holes on top are old and have already released their spore (not palatable).

Walnuts:  Black walnuts litter the ground everywhere in the fall.  Most people find these to be a menace in their yards and on their sidewalks.  With the proper tools and motivation they are delicious.  We have specialized tools for collecting as well as cracking.  We collected 15 gallons of these beauties with the help of the The Nut Wizard®.  More to follow on the processing (cracking) and storage.

Pears:  Though technically not a foraged (wild) food, we reconnected with last year’s supplier (thanks Teri).  Teri has two huge pear trees that are dropping their fruit.  We were able to collect about 10 gallons of pears in about 15 minutes.  However, these pears are not of quite the same quality that you find at the supermarket.  They are bruised, blotchy and bug ridden (but FREE).  Cleaning is a little more work, as all of the bruises and buggy areas have to be removed along with the core and stones.  Needless to say there is a lot of compost generated and our red wigglers in our worm bin were quite happy.  We still managed to have enough pears for freezing in slices (for smoothies, oatmeal, etc.) and making 6 ½ quarts of pear sauce.  We also froze enough pureed pears to make 3 more quarts of pear sauce.  Stay tuned for the pear sauce recipe, as it is extraordinary.

We filled our sink twice.

WARNING: As with all wild food do not consume it unless you are 100% sure of what you are eating.